Golang DD-WRT Bandwidth Usage with Conky

I setup a golang script to fetch the DD-WRT bandwidth usage for the previous 2 months, as well as the last 30 days(rolling).
Using conky then i can display it on my desktop.
My ISP (digiweb), don’t provide any means to check your bandwidth.
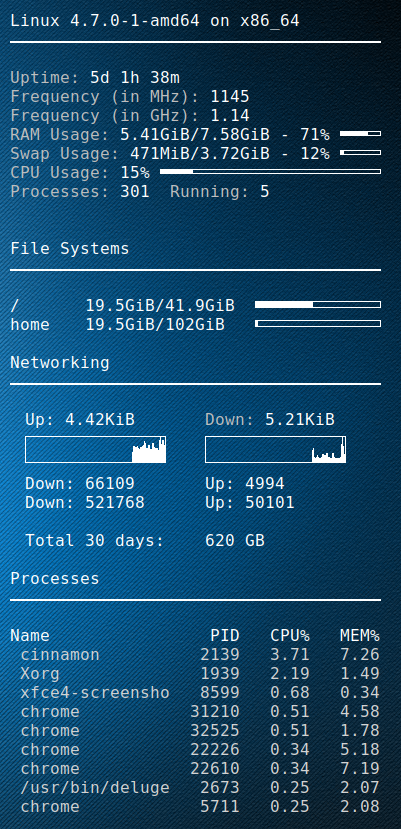
Picture at end of post 🙂

Golang DD-WRT script

package main

import (
    "fmt"
    "strconv"
    "net/http"
    "crypto/tls"
    "io/ioutil"
    "regexp"
    "time"
)

// You set these
var _ddwrt_ip = "10.1.1.1"
var _ddwrt_ssl = true
var _ddwrt_port = 443
var _ddwrt_user = "root"
var _ddwrt_pass = "password"

// don't set these
var _ddwrt_this_month = ""
var _ddwrt_last_month = ""

func printmonth(monthyear string) {
    tr := &http.Transport {
        TLSClientConfig: &tls.Config { InsecureSkipVerify: true },
    }

    client := &http.Client { Transport: tr }

    proto := "http"
    if _ddwrt_ssl == true {
      proto = "https"
    }

    req, err := http.NewRequest( "GET", proto + "://" + _ddwrt_ip + ":" + strconv.Itoa( _ddwrt_port ) + "/ttgraph.cgi?" + monthyear, nil )
    req.SetBasicAuth( _ddwrt_user, _ddwrt_pass )

    resp, err := client.Do( req )
    defer resp.Body.Close()

    if err != nil {
        fmt.Printf( "Error : %s", err)
    }

    if resp.StatusCode != 200 {
        fmt.Printf( "Error code: %s", strconv.Itoa( resp.StatusCode ) )
    }

    bodyBytes, err2 := ioutil.ReadAll( resp.Body )
    if err2 != nil {
        fmt.Printf( "Error : %s", err2 )
    }
    
    if len( _ddwrt_this_month ) == 0 {
        _ddwrt_this_month = string( bodyBytes )
    } else {
        _ddwrt_last_month = string( bodyBytes )
    }

    re := regexp.MustCompile( "(?s)
  • (.*?)
  • " ) matches := re.FindAllString( string( bodyBytes ), -1 ) rein := regexp.MustCompile( "(?s)Incoming: ([0-9]+)" ) reinmatches := rein.FindStringSubmatch( matches[0] ) reout := regexp.MustCompile( "(?s)Outgoing: ([0-9]+)" ) reoutmatches := reout.FindStringSubmatch( matches[0] ) fmt.Printf( "${goto 20}Down: %s ${goto 200}Up: %s\n", reinmatches[1], reoutmatches[1] ) } func parse30days() { var all = _ddwrt_last_month + _ddwrt_this_month re := regexp.MustCompile( "(?s)onmouseover=\"Show(.*?)onmouseout" ) matches := re.FindAllString( all, -1 ) var down int64 var up int64 var total int64 var days30 = 30 for i := len( matches )-1; i >= 0; i-- { reinout := regexp.MustCompile( "(?s)Incoming: ([0-9]+) MB / Outgoing: ([0-9]+) MB" ) inout := reinout.FindStringSubmatch( matches[i] ) r, _ := strconv.ParseInt( inout[1], 10, 64 ) if r == 0 { continue; } down = down + r t, _ := strconv.ParseInt( inout[2], 10, 64 ) up = up + t days30-- if days30 == 0 { break; } } total = down + up fmt.Printf( "\n${goto 20}Total 30 days:${goto 200}%d GB\n", total / 1024 ) } func main() { now := time.Now() monthyear := now.Format("01-2006") printmonth(monthyear) monthyear = now.AddDate(0,-1,0).Format("01-2006") printmonth(monthyear) parse30days() }

    Conky script Integration

    conky.config = {
        alignment = 'top_right',
        background = true,
        border_width = 1,
        cpu_avg_samples = 2,
    	default_color = 'white',
        default_outline_color = 'white',
        default_shade_color = 'white',
        draw_borders = false,
        draw_graph_borders = true,
        draw_outline = false,
        draw_shades = false,
        use_xft = true,
        font = 'DejaVu Sans Mono:size=12',
        gap_x = 50,
        gap_y = 50,
        double_buffer = true,
        minimum_height = 5,
    	minimum_width = 5,
        net_avg_samples = 2,
        no_buffers = true,
        out_to_console = false,
        out_to_stderr = false,
        extra_newline = false,
        own_window = true,
        own_window_class = 'Conky',
        own_window_type = 'desktop',
        own_window_transparent = true,
        stippled_borders = 0,
        update_interval = 3.0,
        uppercase = false,
        use_spacer = 'none',
        show_graph_scale = false,
        show_graph_range = false
    }
    
    conky.text = [[
    $sysname $kernel on $machine
    ${hr 2}
    
    ${color grey}Uptime:$color $uptime
    ${color grey}Frequency (in MHz):$color $freq
    ${color grey}Frequency (in GHz):$color $freq_g
    ${color grey}RAM Usage:$color $mem/$memmax - $memperc% ${membar 4}
    ${color grey}Swap Usage:$color $swap/$swapmax - $swapperc% ${swapbar 4}
    ${color grey}CPU Usage:$color $cpu% ${cpubar 4}
    ${color grey}Processes:$color $processes  ${color grey}Running:$color $running_processes
    
    
    ${color}File Systems
    ${hr 2}
    
    /${goto 80}$color${fs_used /}/${fs_size /} ${goto 250}${fs_bar 6 /}
    /home${goto 80}$color${fs_used /}/${fs_size /home} ${goto 250}${fs_bar 6 /home}
     
    ${color}Networking
    ${hr 2}
    
    ${goto 20}Up:$color ${upspeed wlp3s0} ${goto 200}${color grey}Down:$color ${downspeed wlp3s0}
    ${goto 20}${upspeedgraph wlp3s0 26,140 FFFFFF FFFFFF}${goto 200}${downspeedgraph wlp3s0 26,140 FFFFFF FFFFFF}
    ${execpi 3600 /usr/bin/go run /home/dave/.conky/ddwrt-bandwidth.go}
    
    ${color}Processes
    ${hr 2}
    
    Name                PID   CPU%   MEM%
    ${color lightgrey} ${top name 1} ${top pid 1} ${top cpu 1} ${top mem 1}
    ${color lightgrey} ${top name 2} ${top pid 2} ${top cpu 2} ${top mem 2}
    ${color lightgrey} ${top name 3} ${top pid 3} ${top cpu 3} ${top mem 3}
    ${color lightgrey} ${top name 4} ${top pid 4} ${top cpu 4} ${top mem 4}
    ${color lightgrey} ${top name 5} ${top pid 5} ${top cpu 5} ${top mem 5}
    ${color lightgrey} ${top name 6} ${top pid 6} ${top cpu 6} ${top mem 6}
    ${color lightgrey} ${top name 7} ${top pid 7} ${top cpu 7} ${top mem 7}
    ${color lightgrey} ${top name 8} ${top pid 8} ${top cpu 8} ${top mem 8}
    ${color lightgrey} ${top name 9} ${top pid 9} ${top cpu 9} ${top mem 9}
    
    ]]
    

    Enjoy
    rolling


    Debian SID Opendmarc Installation and Configuration

    In this post i will capture the installation of opendmarc and how its configure alongside Opendkim.

    Install opendmarc

    apt-get install opendmarc

    Configure systemd service file

    cat > /lib/systemd/system/opendkim.service <

    The specific changes here are lines #9 EnvironmentFile #13 -p $SOCKET

    Defaults File

    cat > /etc/default/opendmarc <

    Opendmarc Config file

    cat > /etc/opendmarc.conf <

    Modify Postfix milters
    If you are running both opendkim and opendmarc your milters will look like this:

    non_smtpd_milters = inet:127.0.0.1:12301, inet:127.0.0.1:12302
    smtpd_milters = inet:127.0.0.1:12301, inet:127.0.0.1:12302
    

    Restart the service

    systemctl daemon-reload
    systemctl restart opendmarc
    systemctl restart postfix
    

    DNS

    Now go modify your DNS, adding a TXT record ‘_dmarc‘with the value ‘v=DMARC1; p=none; rua=mailto:postmaster@example.com

    When you have validated dmarc is working properly you can change p=none to p=reject

    How can you validate it?

    There are a number of tools online to help you with this, also you open up a mail in google and click ‘show original’.

    screenshot_2016-11-20_12-32-23
     

    Enjoy

    Other resources
    https://www.google.com/search?q=opendkim+setup

    https://www.google.com/search?q=opendmarc+setup


    Debian SID Opendkim Installation and Configuration Woes

    TL;DR Opendkim. Hats off the to folk who do marvelous packing 99.99999% percent of the time.

    But sometimes they just get it wrong or at least all documentation regarding the package, does not match up with the behavior the packager intended.
    That said, hopefully i will help solve some of these issues here.

    I assume you have postfix already working and you are just looking to add dkim support.

    Install opendkim

    apt-get install opendkim opendkim-tools

    Configure systemd service file

    cat > /lib/systemd/system/opendkim.service <

    The specific changes here are lines #9 EnvironmentFile #13 -p $SOCKET

    Defaults File

    cat > /etc/default/opendkim <

    Opendkim Config file

    cat > /etc/opendkim <

    Specific changes here are lines #7 hashed out socket file,  it simply does not work.
    The only way to get opendkim to honour this setting is passing it to the command line #13 of the service file.

    Modify /etc/postfix/main.cf and add/edit the following lines

    smtpd_milters = inet:localhost:12301
    non_smtpd_milters = inet:localhost:12301

    Create referenced folders for your open dkim keys

    mkdir -vp /etc/dkimkeys/keys

    TrustedHosts

    cat > /etc/dkimkeys/TrustHosts <

    SingingTable

    cat > /etc/dkimkeys/SigningTable <

    KeyTable

    cat> /etc/dkimkeys/KeyTable <

    Create private/public key for signing

    cd /etc/dkimkeys/keys
    opendkim-genkey -s default
    

    Your directory should now look like this

    Opendkim Treeview of files

    Tell systemd to reload the the daemon files and restart

    systemctl daemon-reload
    systemctl restart opendkim
    systemctl restart postfix

    DNS

    Now go modify your DNS, adding a TXT record ‘default._domainkey‘.
    Copy and paste everything between the parenthesis. ( everything here ) into the value field of the TXT record

    cat keys/default.txt 
    default._dkim   IN      TXT     ( "v=DKIM1; k=rsa; "
              "p=MIGfMA0GCSqGSIGNA....BIG LONG DIRTY HASH ....ciaxOhS24T4MFwIDAQAB" )  ; ----- DKIM key default for com
    

    Enjoy

    Other resources
    https://www.google.com/search?q=opendkim+setup


    BIND9 with DDNS updates on Debian Sid

    As part of some work to resolve a kubernetes application deployment.
    The particular application i’m working with has hard dependencies on DNS, particularity, A, TXT and SRV records.
    For each kubernetes pod that spins up, i need it to register itself into DNS.
    Then the other services can discover themselves.

    Here is a basic excerpt of enabling DDNs updates on example.com

    Install the basics

    apt-get install bind bind9utils dnsutils

    Forward Lookup Zone

    cat > /etc/named/db.example.com.conf <

    Reverse Lookup Zone

    cat > /etc/named/db.10.1.1.conf <

    Named local config (should be included from named.conf)

    cat > /etc/named/named.conf.local <

    Key file

    cat > /etc/named/rndc-key <

    Fix any permissions issues and restart the server

    chown root:bind /etc/bind/*
    chmod g+w /etc/bind
    systemctl restart bind9.service

    Test the DDNS updates works

    (
      echo "server 127.0.0.1"
      echo "zone example.com"
    
      echo "update delete xyz.example.com A"
      echo "update add xyz.example.com 120 A 192.0.2.1"
      echo "send"
    ) | /usr/bin/nsupdate -k "/etc/bind/rndc.key"

    Nslookup for good measure

    nslookup xyz.example.com 127.0.0.1

    Debian Sid Intel I217-V Not Working

    After scouring for ages looking for this fix. I’ve decided to document it.
    It comes form a number of sources. Kudos to the individual people.

    Problem
    Rebooting from windows into Linux renders the NIC unusable. the classic “lights are on but no one is home”
    Some people advice disabling PXE etc in the bios. There is a better solution

    Identify the NIC

    root@dave-pc:/lib/systemd/system# lspci | grep Ether
    00:19.0 Ethernet controller: Intel Corporation Ethernet Connection I217-V (rev 04)

    Create a systemd oneshot service file

    cat <> /lib/systemd/system/intelnicreset.service
    [Unit]
    Description=Reset Intel Nic on Boot before it comes up
    Before=NetworkManager.service
    Wants=NetworkManager.service
    
    [Service]
    Type=oneshot
    ExecStart=/usr/bin/resetintelnic
    RemainAfterExit=no
    
    [Install]
    WantedBy=multi-user.target
    EOT

    Reset NIC bash file

    cat <> /usr/bin/resetintelnic
    #!/bin/bash
    
    #Get the PCI-Address of network card (Caution: This works ONLY with ONE NIC)
    PCI=`/usr/bin/lspci | /bin/egrep -i 'network|ethernet' | /usr/bin/cut -d' ' -f1`
    PCIPATH=`/usr/bin/find /sys -name *\${PCI} | /bin/egrep -i *pci0000*`
    /usr/bin/logger -t "ResetNIC" "Resetting PCI NIC ${PCIPATH}"
    
    #Reset the PCI Device completely (like Power-ON/Off)
    echo 1 >${PCIPATH}/reset
    EOT

    Make it executable

    chmod +x /usr/bin/resetintelnic